

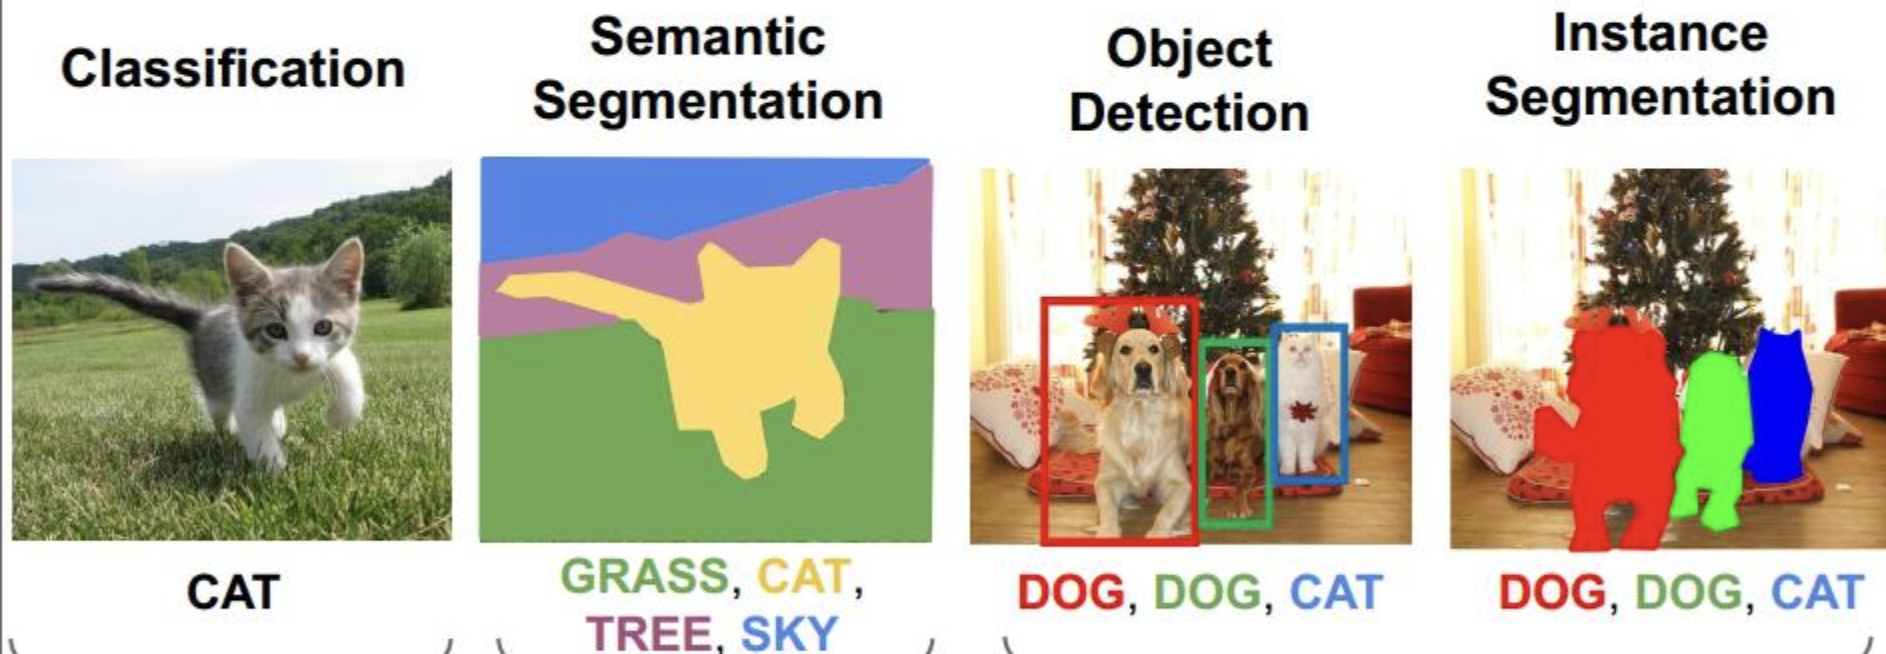
常见的图像识别任务包括图像分类(Image Classification)、目标检测(Object Detection)、语义分割(Semantic Segmentation)和实例分割(Instance Segmentation)。
计算机视觉的常见任务
经典数据集
MNIST数据集
ImageNet数据集
CIFAR-10/100数据集
1. 图像分类 (Image Classification)
原理:
图像分类任务的目的是将输入图像分配到预定义的类别中。常见的算法是卷积神经网络(CNN),它通过卷积层自动提取图像的局部特征,再通过全连接层进行分类。
伪代码:
python


复制编辑
# 伪代码:图像分类
def image_classification(image):
    # 数据预处理:缩放、归一化等
    preprocessed_image = preprocess(image)

    # 定义CNN模型
    model = create_cnn_model()

    # 使用训练好的模型进行预测
    predicted_class = model.predict(preprocessed_image)
    return predicted_class
Python代码实现 (使用Keras):
python


复制编辑
import keras
from keras.models import Sequential
from keras.layers import Conv2D, MaxPooling2D, Flatten, Dense
from keras.preprocessing import image
import numpy as np

# 加载预训练模型(如VGG16)
model = keras.applications.VGG16(weights='imagenet')

# 加载图像并预处理
img_path = 'path_to_image.jpg'  # 输入图片路径
img = image.load_img(img_path, target_size=(224, 224))
img_array = image.img_to_array(img)
img_array = np.expand_dims(img_array, axis=0)
img_array = keras.applications.vgg16.preprocess_input(img_array)

# 使用模型进行预测
predictions = model.predict(img_array)

# 输出预测结果
decoded_predictions = keras.applications.vgg16.decode_predictions(predictions)
print(decoded_predictions)
2. 目标检测 (Object Detection)
原理:
目标检测不仅需要分类物体,还需要在图像中定位物体的具体位置。通常使用区域提议网络(RPN)和分类网络的组合。常见的模型有YOLO(You Only Look Once)和Faster R-CNN。
伪代码:
python


复制编辑
# 伪代码:目标检测
def object_detection(image):
    # 数据预处理:图像缩放、归一化等
    preprocessed_image = preprocess(image)

    # 使用目标检测模型(如YOLO)
    model = create_yolo_model()

    # 检测图像中的物体
    bounding_boxes, class_labels = model.detect_objects(preprocessed_image)
    return bounding_boxes, class_labels
Python代码实现 (使用YOLO模型):
python


复制编辑
import cv2
import numpy as np

# 加载预训练的YOLO模型
net = cv2.dnn.readNet("yolov3.weights", "yolov3.cfg")
layer_names = net.getLayerNames()
output_layers = [layer_names[i - 1] for i in net.getUnconnectedOutLayers()]

# 读取图像
img = cv2.imread('image.jpg')
height, width, channels = img.shape

# 预处理图像
blob = cv2.dnn.blobFromImage(img, 0.00392, (416, 416), (0, 0, 0), True, crop=False)
net.setInput(blob)
outs = net.forward(output_layers)

# 解析输出并绘制检测框
for out in outs:
    for detection in out:
        scores = detection[5:]
        class_id = np.argmax(scores)
        confidence = scores[class_id]
        if confidence > 0.5:
            center_x = int(detection[0] * width)
            center_y = int(detection[1] * height)
            w = int(detection[2] * width)
            h = int(detection[3] * height)
            cv2.rectangle(img, (center_x, center_y), (center_x + w, center_y + h), (0, 255, 0), 2)

# 显示检测结果
cv2.imshow('Detected Image', img)
cv2.waitKey(0)
cv2.destroyAllWindows()
3. 图像分割 (Image Segmentation)
原理:
图像分割的任务是将图像分成多个有意义的区域,每个区域对应图像中的一个物体或部分。常见的分割方法包括语义分割和实例分割,深度学习中常用U-Net和Mask R-CNN模型。
伪代码:
python


复制编辑
# 伪代码:图像分割
def image_segmentation(image):
    # 数据预处理
    preprocessed_image = preprocess(image)

    # 加载分割模型(如U-Net)
    model = create_unet_model()

    # 进行图像分割
    segmentation_mask = model.predict(preprocessed_image)
    return segmentation_mask
Python代码实现 (使用U-Net模型):
python


复制编辑
from tensorflow.keras.models import load_model
import numpy as np
import cv2

# 加载预训练的U-Net模型
model = load_model('unet_model.h5')

# 读取图像并预处理
img = cv2.imread('image.jpg', cv2.IMREAD_GRAYSCALE)
img = cv2.resize(img, (256, 256))
img = np.expand_dims(img, axis=-1)
img = img / 255.0

# 预测分割结果
segmentation_result = model.predict(np.expand_dims(img, axis=0))

# 显示分割结果
segmentation_mask = segmentation_result[0, :, :, 0]  # 只取第一个通道
cv2.imshow('Segmentation Mask', segmentation_mask)
cv2.waitKey(0)
cv2.destroyAllWindows()
4. 人脸识别 (Face Recognition)
原理:
人脸识别是通过检测图像中的人脸并对其进行身份验证或识别。常见的算法有Haar特征分类器、HOG+SVM以及基于深度学习的FaceNet和OpenFace。
伪代码:
python


复制编辑
# 伪代码:人脸识别
def face_recognition(image):
    # 使用预训练的模型检测人脸
    faces = detect_faces(image)

    # 对每个人脸进行识别
    for face in faces:
        identity = recognize_face(face)
    return identity
Python代码实现 (使用OpenCV和dlib):
python


复制编辑
import cv2
import dlib

# 加载人脸检测器和人脸识别模型
detector = dlib.get_frontal_face_detector()
predictor = dlib.shape_predictor('shape_predictor_68_face_landmarks.dat')
face_rec_model = dlib.face_recognition_model_v1('dlib_face_recognition_resnet_model_v1.dat')

# 读取图像
img = cv2.imread('image.jpg')

# 检测人脸
gray = cv2.cvtColor(img, cv2.COLOR_BGR2GRAY)
faces = detector(gray)

# 获取并识别人脸特征
for face in faces:
    landmarks = predictor(gray, face)
    face_descriptor = face_rec_model.compute_face_descriptor(img, landmarks)
    print(face_descriptor)
5. 姿态估计 (Pose Estimation)
原理:
姿态估计的任务是预测图像中人体或物体的关键点位置,常用于人类动作分析。OpenPose和PoseNet是比较常用的姿态估计算法。
伪代码:
python


复制编辑
# 伪代码:姿态估计
def pose_estimation(image):
    # 加载姿态估计模型
    model = load_pose_estimation_model()

    # 对图像进行姿态估计
    keypoints = model.estimate_pose(image)
    return keypoints
Python代码实现 (使用OpenPose):
python


复制编辑
import cv2
import pyopenpose as op

# 初始化OpenPose
params = {'model_folder': 'models/'}
opWrapper = op.WrapperPython()
opWrapper.configure(params)
opWrapper.start()

# 读取图像
img = cv2.imread('image.jpg')

# 进行姿态估计
datum = op.Datum()
datum.cvInputData = img
opWrapper.emplaceAndPop([datum])

# 显示结果
cv2.imshow('Pose Estimation', datum.cvOutputData)
cv2.waitKey(0)
cv2.destroyAllWindows()
6. 图像超分辨率 (Image Super-Resolution)
原理:
图像超分辨率任务的目的是将低分辨率的图像转换为高分辨率图像。常用的算法包括SRCNN、VDSR等,它们通常使用深度学习模型来生成细节。
伪代码:
python


复制编辑
# 伪代码:图像超分辨率
def image_super_resolution(image):
    # 数据预处理
    preprocessed_image = preprocess(image)

    # 加载超分辨率模型
    model = load_sr_model()

    # 进行超分辨率处理
    high_res_image = model.predict(preprocessed_image)
    return high_res_image
Python代码实现 (使用ESRGAN):
python


复制编辑
import torch
from model import ESRGAN  # 假设你有ESRGAN模型定义

# 加载预训练模型
model = ESRGAN()
model.load_state_dict(torch.load('esrgan.pth'))
model.eval()

# 读取低分辨率图像
lr_image = cv2.imread('low_res_image.jpg')

# 转换为PyTorch张量并进行预处理
lr_image_tensor = torch.from_numpy(lr_image).float().permute(2, 0, 1).unsqueeze(0) / 255.0

# 使用ESRGAN进行超分辨率处理
with torch.no_grad():
    sr_image_tensor = model(lr_image_tensor)

# 转换回图像格式并显示
sr_image = sr_image_tensor.squeeze(0).permute(1, 2, 0).numpy() * 255.0
sr_image = sr_image.astype(np.uint8)
cv2.imshow('Super Resolution', sr_image)
cv2.waitKey(0)
cv2.destroyAllWindows()
7. 光流估计 (Optical Flow Estimation)
原理:
光流估计用于分析视频中物体的运动,它估计的是像素在连续帧之间的位移。在运动分析、视频稳定、目标跟踪等领域有重要应用。常用的算法有Lucas-Kanade方法和Farneback方法。
伪代码:
python


复制编辑
# 伪代码:光流估计
def optical_flow_estimation(prev_image, next_image):
    # 使用光流算法计算图像间的像素位移
    flow = calculate_optical_flow(prev_image, next_image)
    return flow
Python代码实现 (使用OpenCV的Farneback方法):
python


复制编辑
import cv2
import numpy as np

# 读取前后两帧图像
prev_frame = cv2.imread('frame1.jpg', cv2.IMREAD_GRAYSCALE)
next_frame = cv2.imread('frame2.jpg', cv2.IMREAD_GRAYSCALE)

# 计算光流(Farneback方法)
flow = cv2.calcOpticalFlowFarneback(prev_frame, next_frame, None, 0.5, 3, 15, 3, 5, 1.2, 0)

# 显示光流
magnitude, angle = cv2.cartToPolar(flow[..., 0], flow[..., 1])
flow_image = np.zeros_like(prev_frame)
flow_image[..., 0] = angle * 180 / np.pi / 2
flow_image[..., 1] = cv2.normalize(magnitude, None, 0, 255, cv2.NORM_MINMAX)
flow_image[..., 2] = 255

# 显示结果
cv2.imshow('Optical Flow', flow_image)
cv2.waitKey(0)
cv2.destroyAllWindows()
8. 图像描述与生成 (Image Captioning)
原理:
图像描述任务是根据图像生成自然语言描述。该任务通常结合卷积神经网络(CNN)和循环神经网络(RNN)或Transformer模型。CNN用于从图像中提取特征,而RNN/Transformer用于生成图像的描述。
伪代码:
python


复制编辑
# 伪代码:图像描述生成
def image_captioning(image):
    # 提取图像特征
    image_features = extract_features(image)

    # 使用RNN或Transformer生成描述
    caption = generate_caption(image_features)
    return caption
Python代码实现 (使用预训练模型):
python


复制编辑
import tensorflow as tf
from tensorflow.keras.preprocessing import image
import numpy as np

# 加载预训练的图像描述模型(例如Show and Tell模型)
model = tf.keras.models.load_model('image_captioning_model.h5')

# 加载并预处理图像
img = image.load_img('image.jpg', target_size=(224, 224))
img_array = image.img_to_array(img)
img_array = np.expand_dims(img_array, axis=0)

# 提取图像特征
image_features = model.extract_features(img_array)

# 生成描述
caption = model.generate_caption(image_features)
print(caption)
9. 文本检测与识别 (Text Detection and Recognition)
原理:
文本检测任务是从图像中定位出文本区域,文本识别任务则是识别文本区域中的具体内容。常见的技术有EAST (Efficient and Accurate Scene Text detector) 和CRNN (Convolutional Recurrent Neural Network)。
伪代码:
python


复制编辑
# 伪代码:文本检测与识别
def text_detection_and_recognition(image):
    # 使用EAST或其他文本检测方法定位文本区域
    text_regions = detect_text_regions(image)

    # 对文本区域进行识别
    recognized_text = recognize_text_in_regions(text_regions)
    return recognized_text
Python代码实现 (使用OpenCV和EAST文本检测):
python


复制编辑
import cv2
import numpy as np

# 加载EAST模型
net = cv2.dnn.readNet('frozen_east_text_detection.pb')

# 读取输入图像
image = cv2.imread('text_image.jpg')
height, width = image.shape[:2]

# 预处理图像
blob = cv2.dnn.blobFromImage(image, 1.0, (width, height), (123.68, 116.78, 103.94), swapRB=True, crop=False)
net.setInput(blob)

# 获取文本检测结果
scores, geometry = net.forward(['score1', 'geometry1'])

# 解析结果并绘制文本框
# 具体的解析过程可参考OpenCV官方文档
总结
这些常见的计算机视觉任务涵盖了从图像处理、目标检测到视频分析等多种应用。通过深度学习技术,尤其是卷积神经网络(CNN)、循环神经网络(RNN)、生成对抗网络(GAN)等,我们可以解决越来越复杂的视觉问题。每个任务都可以通过使用开源框架(如TensorFlow、PyTorch、OpenCV)来实现,部分任务(如图像分类、目标检测)已经有预训练模型可供使用,可以极大简化开发过程。